Insulating a New House
If you are buying or building a new house, make sure that energy-saving features are included. The Federal Trade Commission (FTC) home insulation rule requires the seller of a new home to provide information on the type, thickness, and R-value of the insulation that will be installed in each part of the house in every sales contract. Many state or local building codes include minimum requirements for home insulation. Be sure that your new home or home addition meets these building codes. You may wish to install insulation beyond the minimum specified in such codes, especially if those minimum levels are below those recommended here. Also, Energy-Efficient Mortgages are available through both government-insured and conventional loan programs. These mortgages recognize that the homeowner's energy payments will be less for a more energy-efficient home, and therefore enable a buyer to borrow a larger sum to cover the up-front costs of improving the house's energy efficiency.
To keep initial selling prices competitive, many home builders offer standard (not optimal) levels of insulation, although additional insulation would be a good investment for the buyer. Builders participating in the Energy Star Program use third-party inspectors to not only ensure that the correct amount of insulation has been used, but also to ensure that it has been installed correctly.
Now is also the time to make your home air tight. Special products and techniques are available to eliminate air leaks between the walls and floor and between the walls and ceiling. Encourage your builder to make all clearances around doors and windows as tight as possible and to properly caulk and seal all such joints.
Where and How Much?
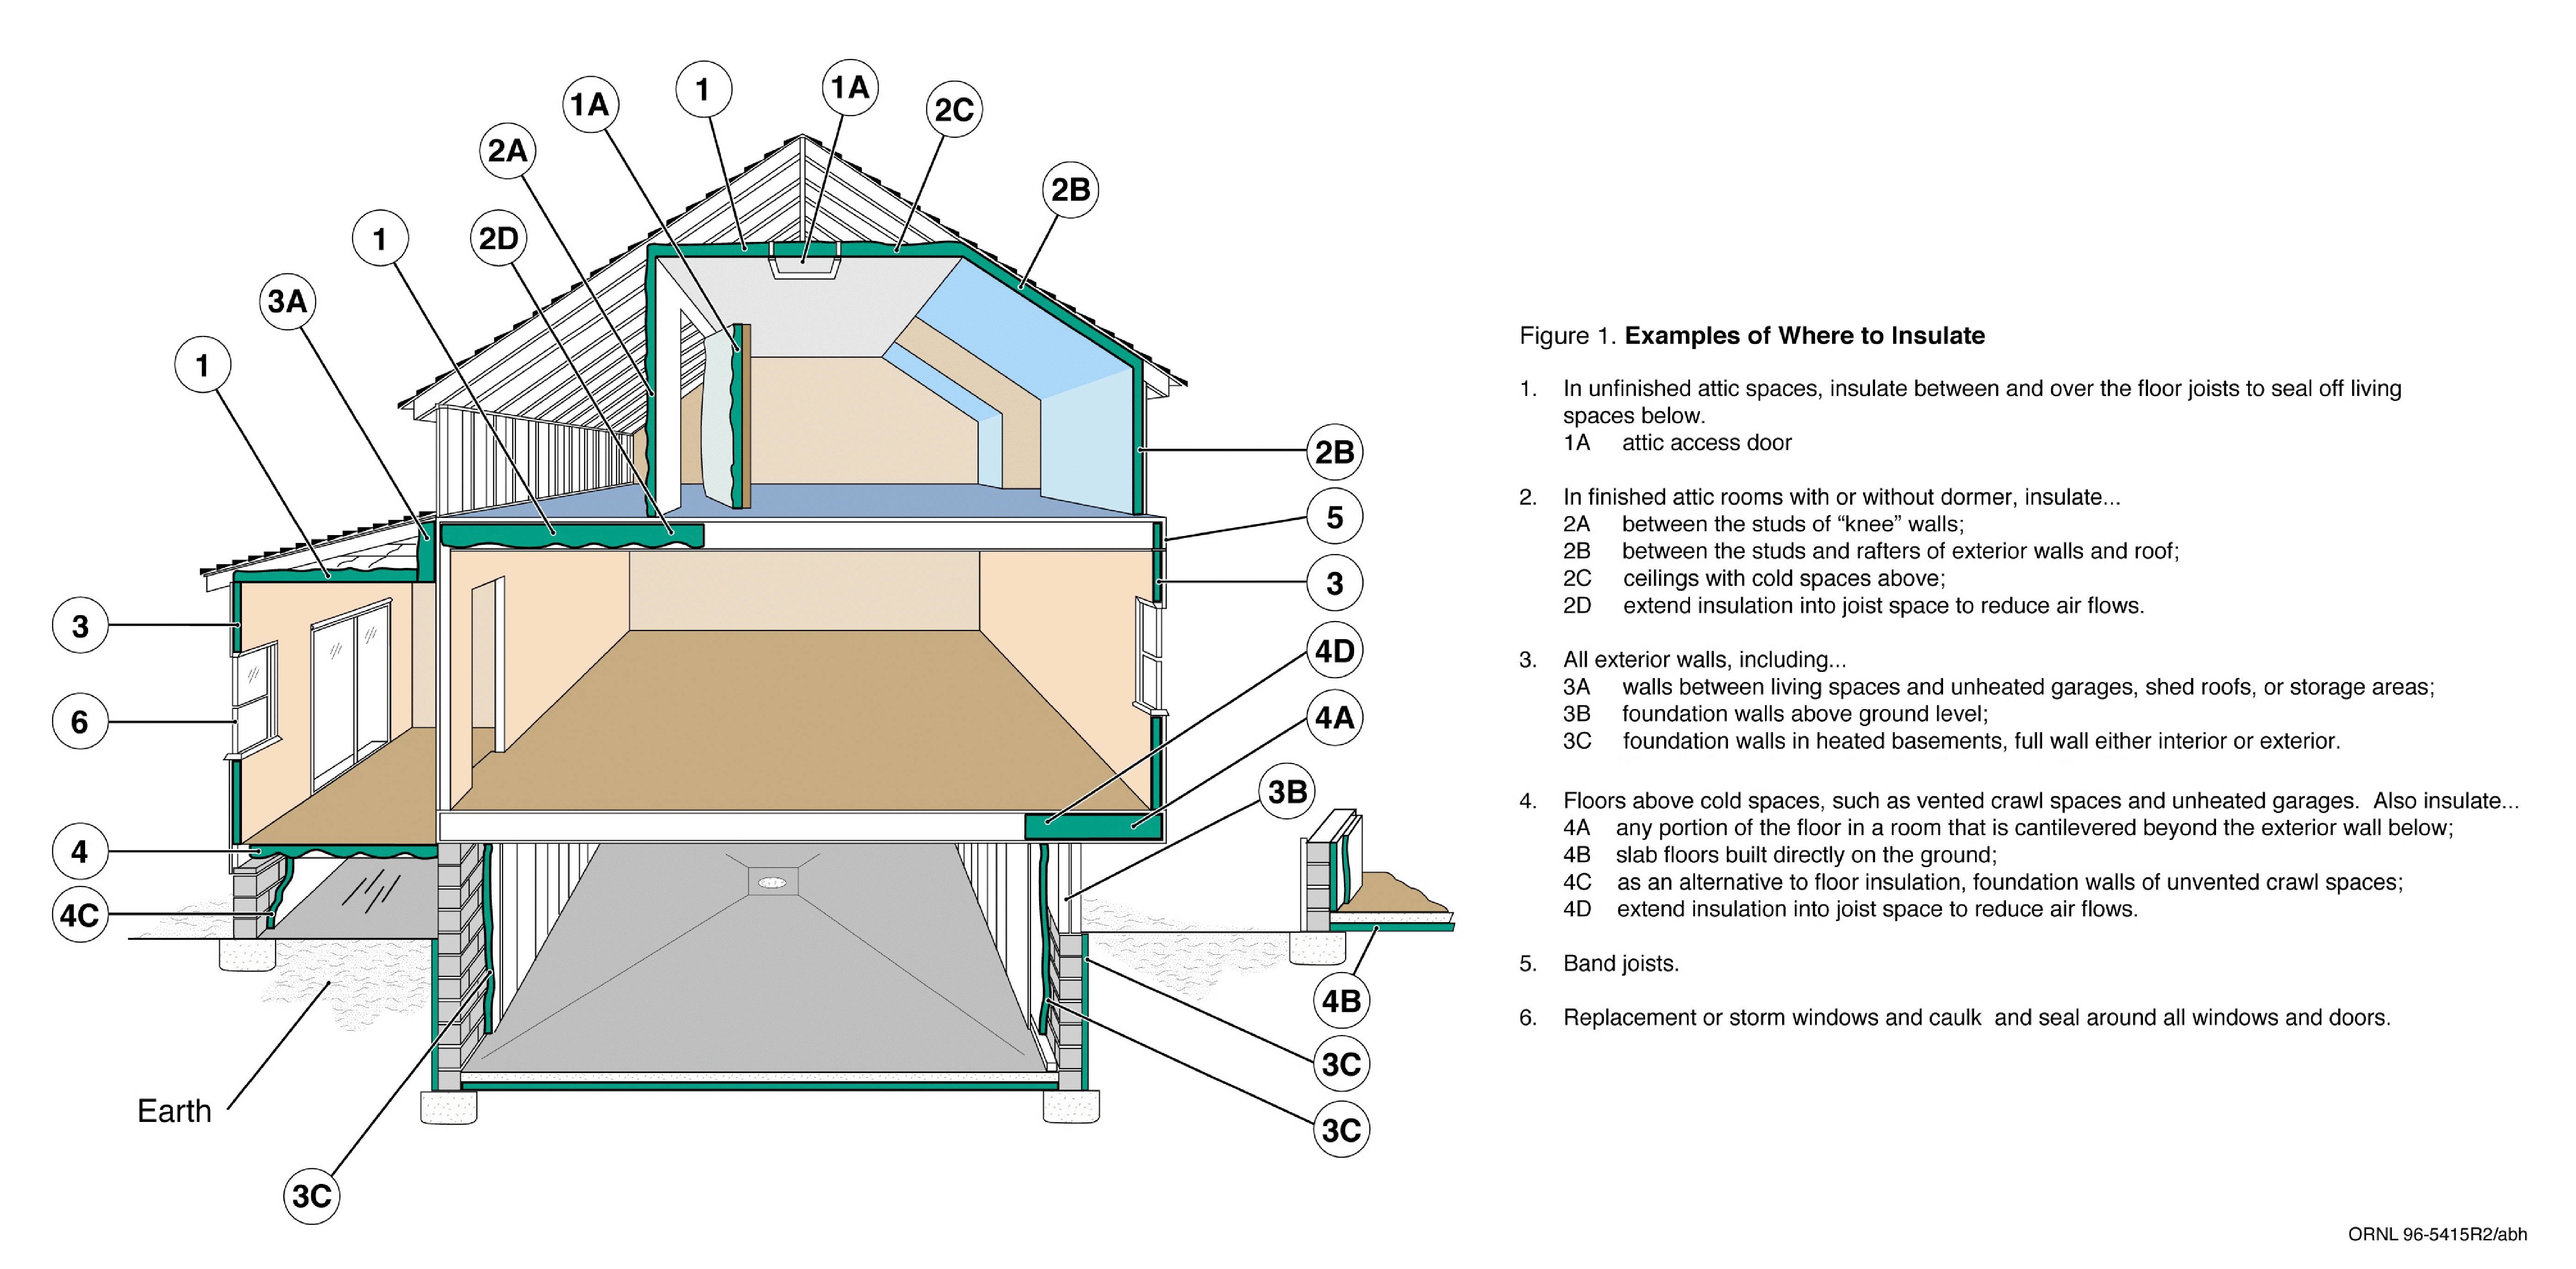
Figure 1 shows which building spaces should be insulated. Discuss the house plans with your builder, and make sure each of these spaces is properly insulated to the R-values recommended here. Remember to buy the insulation based on this R-value, and to check the product label to determine the insulation's proper thickness, especially if you plan to install it in a confined space, such as in wall cavities and cathedral ceilings.
Figure 2 shows the Department of Energy's climate zones, along with a short summary of our insulation recommendations for new houses. These recommendations are based on comparing your future energy savings to the current cost of installing insulation. A range is shown for many locations for these reasons:
- Energy costs vary greatly over each zone.
- Installed insulation costs vary greatly over each zone.
- Heating and cooling equipment efficiency varies from house to house.
- Our best estimate of future energy costs may not be exactly correct.
So, how should you decide how much insulation to install?
The future energy savings, of course, depends upon how much energy costs in the future. Our best estimate is that fuel costs will rise at approximately the same rate as general inflation. If you think that fuel costs will increase more than that, you should install the greater amount of insulation shown. Looking at the map, if you think the energy costs in your area are greater than energy costs for other locations in same climate zone, you should install the greater amount of insulation.
We can also give you better guidance for your specific location and recommendations for other insulation locations in your home. The ZIP-Code calculator will actually let you enter your own insulation prices, energy costs, and heating and cooling system efficiencies. However, some computer security systems won't allow Java programs to run properly. The recommended R-values table can be helpful in those cases, because it will provide recommendations based on insulation and energy costs for your local area.
Both insulative sheathing and cavity insulation are specified for walls because it is important to use them together as a system. Any combination of sheathing and cavity insulation shown in Figure 2 will give you a similar life-cycle savings.
The band joists, or outside edges of the floor frames, should be insulated while the house is under construction. For most of the country, you should try to install R-30 in this location. If you live in Climate Zone 1, R-19 is adequate. More detailed drawings and insulation techniques for the band joist are shown in the Wall Insulation Technology Fact Sheet.

Foundation insulation options for new construction are broader than for existing homes. The builder may, for example, choose to insulate the exterior of a basement or crawlspace wall. You should discuss termite inspection and control options with your builder when choosing your foundation insulation method. Special sill plate (the joint between the top of the foundation and the bottom of the house frame) mineral fiber sealing products are designed to reduce air leaks if installed during the initial house construction. All flammable insulations or insulation facings must be covered or otherwise protected to meet fire codes. More information is given in the Basement Insulation Technology Fact Sheet.
If water lines and the ducts of your heating or air-conditioning system run through unheated or uncooled spaces, such as attic or crawlspaces, then the water lines and the ducts should be insulated. Make sure your contractor checks the ductwork for air leaks before installing the duct insulation. The contractor should then wrap the ducts with duct wrap insulation of R-6 with a vapor retarder facing on the outer side. All joints where sections of insulation meet should have overlapped facings and be tightly sealed with fiber glass tape; but avoid compressing the insulation, thus reducing its thickness and R-value.
Return air ducts are more likely to be located inside the heated portion of the house where they don't need to be insulated, but they should still be sealed off from air passageways that connect to unheated areas. Drywall- to-ductwork connections should be inspected because they are often poor (or nonexistent) and lead to unwanted air flows through wall cavities.
Air Sealing
Air sealing is important, not only because drafts are uncomfortable, but also because air leaks carry both moisture and energy, usually in the direction you don't want. For example, air leaks can carry hot humid outdoor air into your house in the summer, or can carry warm moist air from a bathroom into the attic in the winter.
Most homeowners are aware that air leaks into and out of their houses through small openings around doors and window frames and through fireplaces and chimneys. Air also enters the living space from other unheated parts of the house, such as attics, basements, or crawlspaces. The air travels through:
- any openings or cracks where two walls meet, where the wall meets the ceiling, or near interior door frames;
- gaps around electrical outlets, switch boxes, and recessed fixtures;
- gaps behind recessed cabinets, and furred or false ceilings such as kitchen or bathroom soffits;
- gaps around attic access hatches and pull-down stairs;
- behind bath tubs and shower stall units;
- through floor cavities of finished attics adjacent to unconditioned attic spaces;
- utility chaseways for ducts, etc., and
- plumbing and electrical wiring penetrations.
These leaks between the living space and other parts of the house are often much greater than the obvious leaks around windows and doors. Since many of these leakage paths are driven by the tendency for warm air to rise and cool air to fall, the attic is often the best place to stop them. It's important to stop these leaks before installing attic insulation because the insulation may hide them and make them less accessible. Usually, the attic insulation itself will not stop these leaks and you won't save as much as you expect because of the air flowing through or around the insulation.
There are several fact sheets that will help you stop these air leaks:
When natural ventilation has been sharply reduced, as in a more energy-efficient house, it may be necessary to provide fresh air ventilation to avoid build-up of stale air and indoor air pollutants. Special air-to-air heat exchangers, or heat-recovery ventilators, are available for this purpose. It is also possible to incorporate a supply of fresh outside air into your heating and cooling system. This arrangement can be used to create a slightly higher pressure inside your home, which will prevent uncontrolled outside air infiltration into your home. For more details on this arrangement, see "Integration with forced-air heating and air-conditioning systems" in the Whole-House Ventilation Systems Technology Fact Sheet.
Moisture Control and Ventilation
We talk about moisture control in an insulation fact sheet because wet insulation doesn't work well. Also, insulation is an important part of your building envelope system, and all parts of that system must work together to keep moisture from causing damage to the structure or being health hazards to the occupants. For example, mold and mildew grow in moist areas, causing allergic reactions and damaging buildings.
Moisture can enter your home during the construction process. The building materials can get wet during construction due to rain, dew, or by lying on the damp ground. Concrete walls and foundations release water steadily as they continue to cure during the first year after a home is built. During the house's first winter, this construction moisture may be released into the building at a rate of more than two gallons per day, and during the second winter at a slower rate of about one gallon per day. You may need to use dehumidifiers during this initial time period.
When Is Moisture a Problem?
Rain water can leak into your wall cavities if the windows are not properly flashed during installation. Also, when moist air touches a cold surface, some of the moisture may leave the air and condense, or become liquid. If moisture condenses inside a wall, or in your attic, you will not be able to see the water, but it can cause a number of problems.
Four Things You Can Do to Avoid Moisture Problems:
- Control liquid water. Rain coming
through a wall, especially a basement or crawlspace wall, may be less apparent than a roof leak,
especially if it is a relatively small leak and the water remains inside the wall cavity. Stop all rain-water paths into your home by:
- Use a Weather-Resistive Barrier.
- Caulk around all your windows and doors.
- Direct all water coming off your roof away from your house by sloping the soil around your house so that water flows away from your house.
- Use wide overhangs to keep the rain away from your walls and windows.
- Use large gutters and gutter guards to help keep rain from dripping onto the ground near the house.
- Ventilate. You need to ventilate your home because you and your family generate moisture when you cook, shower, do laundry, and even when you breathe. More than 99% of the water used to water plants eventually enters the air. If you use an unvented natural gas, propane, or kerosene space heater, all the products of combustion, including water vapor, are exhausted directly into your living space. This water vapor can add up to 5 to 15 gallons of water per day to the air inside your home. If your clothes dryer is not vented to the outside, or if the outdoor vent is closed off or clogged, all that moisture will enter your living space. Just by breathing and perspiring, a typical family adds about 3 gallons of water per day to their indoor air. You especially need to vent your kitchen and bathrooms. Be sure that these vents go directly outside, and not to your attic, where the moisture can cause problems. Remember that a vent does not work unless you turn it on; so select quieter models that you are more likely to use. If your attic is ventilated, it is important that you never cover or block attic vents with insulation. Take care to prevent loose-fill insulation from clogging attic vents by using baffles or rafter vents. These baffles also serve to keep the outside air from penetrating into the insulation. When you think about venting to remove moisture, you should also think about where the replacement air will come from, and how it will get into your house. For more information about controlled ventilation, see the Whole-House Ventilation Systems Technology Fact Sheet.
- Stop Air Leaks. It is very important to seal up all air-leakage paths between your living spaces and other parts of your building structure. Measurements have shown that air leaking into walls and attics carries significant amounts of moisture. Remember that if any air is leaking through electrical outlets or around plumbing connections into your wall cavities, moisture is carried along the same path. The same holds true for air moving through any leaks between your home and the attic, crawlspace, or garage. Even very small leaks in duct work can carry large amounts of moisture, because the airflow in your ducts is much greater than other airflows in your home. This is especially a problem if your ducts travel through a crawlspace or attic, so be sure to seal these ducts properly (and keep them sealed!). Return ducts are even more likely to be leaky, because they often involve joints between drywall and ductwork that may be poorly sealed, or even not sealed at all.
- Plan a moisture escape path. Typical attic ventilation arrangements are one example of a planned escape path for moisture that has traveled from your home's interior into the attic space. Cold air almost always contains less water than hot air, so diffusion usually carries moisture from a warm place to a cold place. You can let moisture escape from a wall cavity to the dry outdoors during the winter, or to the dry indoors during the summer, by avoiding the use of vinyl wall coverings or low-perm paint. You can also use a dehumidifier to reduce moisture levels in your home, but it will increase your energy use and you must be sure to keep it clean to avoid mold growth. If you use a humidifier for comfort during the winter months, be sure that there are no closed-off rooms where the humidity level is too high.
- Wear clothing adequate to protect against skin contact and irritation. A long-sleeved shirt with collar and cuffs buttoned, gloves, hat, glasses, and disposable dust respirator are advisable in all do-it-yourself insulation projects. Also, read the label and follow all the manufacturer's directions.
- Do not cover or hand-pack insulation around bare stove pipes, electrical fixtures, motors, or any heat-producing equipment such as recessed lighting fixtures. If you pack insulation around these heat-producting locations, the heat can build up, leading to fire. Electrical fire-safety codes prohibit the installation of thermal insulation within three inches of a recessed fixture enclosure, wiring compartment, or ballast, or above the fixture so that it will trap heat and prevent free circulation of air, unless the fixture is identified by label as suitable for insulation to be in direct contact with the fixture. THIS IS FOR FIRE SAFETY.
- Do not cover attic vents with insulation. Proper ventilation must be maintained to avoid overheating in summer and moisture build-up all year long.
- Don't compress the insulation to fit behind pipes or wires. Instead cut to the middle of the batt's thickness so you have one flap under the pipe or wire and the other flap over the pipe or wire.
- One common mistake is to leave narrow places between close-spaced wall studs uninsulated. Even though these spaces may look like a very small part of the wall, small uninsulated areas can greatly reduce the insulation performance of the whole wall. Strips of insulation should be cut off and stuffed into such tight spaces by hand.
- The kraft paper or foil vapor retarder facings on many blanket insulation products must be covered with gypsum or interior paneling because of fire considerations.
Should you use vapor retarders?
Moisture can travel from the ground through the foundation and up into your walls, and through slab floors into your home. So your builder should always include a vapor retarder between the foundation and the walls. Should you include a vapor retarder in your wall? If so, where? If the outside air is colder and drier than the inside of a home, then moisture from inside the warm house will try to diffuse through the walls and ceiling toward the cold, dry outside air. If the outside air is hot and humid, then moisture from outside will try to diffuse through the walls toward the dry, air-conditioned inside air. We used to tell people to install vapor retarders to try and stop this moisture diffusion. But we have learned that if moisture moves both ways for significant parts of the year, you're better off not using a vapor retarder in the walls at all.
Installation Issues
Your builder will most likely hire a subcontractor to install the insulation in your new home. However, it is a good idea to educate yourself about proper installation methods because an improper installation can reduce your energy savings.
Insulation Installation Precautions
Attics
In some houses, it is easier to get complete coverage of the attic floor with blown-in loose-fill insulation. Loose-fill insulation must be prevented from shifting into vents or from contacting heat-producing equipment (such as recessed lighting fixtures) by using baffles or retainers.
If batts or rolls are used, the first layer should be fit between the joists. The second layer should be placed perpendicular to the first because that will help to cover the tops of the joists themselves and reduce thermal bridging through the frame. Also, be sure to insulate the trap or access door. Although the area of the door is small, an uninsulated attic door will reduce energy savings substantially.
To be effective, Reflective Systems must be installed according to the manufacturer's instructions.
Radiant barriers may be installed in attics in several configurations. The radiant barrier is most often attached near the roof, to the bottom surface of the attic truss chords or to the rafter framing. A radiant barrier should never be placed on top of your insulation or on the attic floor because it will soon be covered with dust and will not work. A separate DOE fact sheet is available for radiant barriers to show which parts of the country are most likely to benefit from this type of system.
Walls